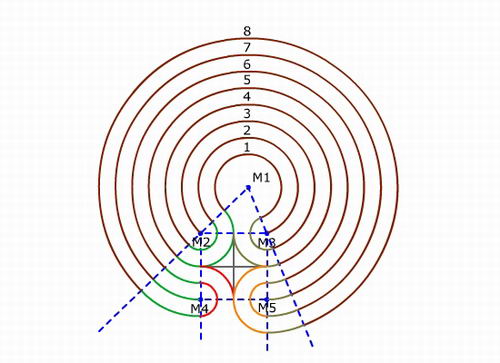
After the discovery of the Knidos labyrinth the geometry and the exact construction is asked.
There are classical labyrinths with a larger center since longer, also as walkable labyrinths. However I noticed that were certain artistic freedoms to design them. For instance that the turning points are not in a square, or that the central cross is displaced, or the ways are differently broad.
After longer trying I found out how one can design best (at least in my opinion) geometrically and mathematically exactly a classical labyrinth with a larger center (that I call from now on Knidos labyrinth).
In practice the quadruple of the way’s width is a good measure for the center. That is also the measure for the four turning points of the internal square, on which these are situated. The sizes of the circle of the center and the square have thus a good purchase within the labyrinth.
All lines of the labyrinth ways and the way axes are circular arcs, which are clashing without break. The segments, within those the circular arcs with the same center are lying, result from the lines through the 5 centers of the labyrinth.
Maybe the drawings shows more simply what in words sounds so complicated.
That is the basic structure of the construction. In the classical labyrinth the center for the upper arcs is between the two upper corner points of the square. In the Knidos labyrinth this center (marked with M1) goes upwards. The distance M2-M1 is fourfold the way’s width (2 ways + the half center); the distance M3-M1 is threefold the way’s width (1 way + the half center).
The lengthenings of the aforementioned distances form at the same time the delimitation of the upper 8 circular arcs, which have all their center in M1. The further segments are built by lengthenings of the distances M2-M4 and M3-M5. The points M2 to M5 are both the turning points of the labyrinth as well as the centers of the further circular arcs.
With M2 as center all free ends of the preceding arcs on the left side are connected. The three lower arcs end at the line M2-M4.
The same happens on the right side, whereby the lower 4 arcs end at the line M3-M5.
Around the center M4 a semi-circle connects two further open ends of the preceding arcs. A quarter circle around M4 connects the lower free end of the central cross with the left end of the central cross.
Four further semi-circles around the center M5 connect the three open ends on the right side and the right end of the central cross. Thus the construction of the labyrinth is finished.
Here again the whole labyrinth without the auxiliary lines. The central lozenge is the result when all ways are designed in same width.
Related Posts
- The Knidos Labyrinth
- The Knidos Labyrinth Prototype
- How to build a Knidos Labyrinth with Bark Mulch
- How to build a Knidos Labyrinth with Paving Stones


Pingback: Tutorial on how to draw a Classical 7 Circuit Labyrinth in Knidos Style | blogmymaze
Pingback: How to Draw a Classical Finger Labyrinth | blogmymaze
Pingback: Type or Style / 8 | blogmymaze
Pingback: How to Draw a Labyrinth « blogmymaze
Pingback: Does the Chartres Labyrinth hide a Troy Town and if so, what does it look like? « blogmymaze
Pingback: The Twisted Labyrinth « blogmymaze
Pingback: How to build a Knidos Labyrinth with Bark Mulch « blogmymaze
Pingback: How to mowe a Labyrinth into a Meadow? « blogmymaze
Erwin, this is so beautiful… before reading any words, I just let my eyes gaze over the lines, squares, colors, and curving lines, and emerging path… I love when right brain and left brain dance together, creating beauty… Thank you!
LikeLike
This is a neat extension of how to draw a classical seven circuit labyrinth! It is done with precision and sacred geometry. Congratulations!
Normally I draw a classical seven circuit labyrinth freehand. That way, I can make the goal as wide (like the big circle in the Knidos example above), or as small as the width of the path.
Sacred geometry is integral to ALL truly sacred space. So how can a free hand drawing be classified as sacred geometry which normally requires the use of a straight edge and pair of compasses (as with Erwin’s Knidos)?
First, to be truly understood (I’d say “gnown”), sacred geometry MUST be done by hand – not with the left analytical brain alone.
When you start freehand drawing a labyrinth using the seed pattern (see ), at first, the beginner struggles to remember the rules of how to draw it. But by the tenth attempt, something magical happens – instead of knowing how to draw one, suddenly, you gnow (both left AND right brain) how to make one! Your analytical brain is no longer needed; you hand gnows how to draw it. This is – in my book at least – evidence of sacred geometry in action.
In closing, I must say that the vast majority of sacred spaces are constructed using a pair of compasses and a straight edge, and Erwin’s exciting new Knidos labyrinth is a good example of this. I just wanted to put in the word for the legitimacy of free hand labyrinths as well.
LikeLike